Overview
What is EPDM?
EPDM is an acronym for ethylene propylene diene terpolymer. It’s quite the mouthful and you can see why the acronym of EPDM is commonly used.
EPDM is a synthetic rubber membrane that is very durable and is commonly used on gently sloping roofs, which are often found on RV’s. It comes in a variety of thicknesses and widths and is typically cut to length.
For RV purposes, EPDM is usually installed using an adhesive and the edges and trim are made watertight using additional sealants.
It has a long life when properly cared for. However, when it comes time to replace it, I feel this is a DIY project almost anyone can tackle.
Where to buy?
EPDM roofing for RVs can be purchased at a variety of places. There are a number of independent retailers who sell the kits, as well as on Amazon. I actually purchased my kit on Amazon.
Materials and Supplies
RecPro – Dicor EPDM RV Rubber Roof Kit
The kit I purchased on Amazon was from RecPro and it is the 8.5′ Wide Dicor EPDM RV Rubber Roof Kit. I have a 24′ camper, but I purchased the 30′ kit because of a few extra supplies it comes with.
Before we get into the kit contents, let’s take a look at a few of the specs.
Features and Specifications:
- 8′ 6″ wide
- .040″ Thick
- Industry-standard for RV roofing
- Weatherproof
- Energy efficient
- Puncture and tear resistance
- Low maintenance
- Strong durable synthetic rubber
- EPDM Roofing is fire resistant
- Watertight seal
- Fast drying time for RecPro Adhesives
EPDM kit components and cost
As I mentioned above, I purchased the 30′ kit because it provided some additional supplies I thought may be beneficial. The prices I am providing below are for kits and based on length.
Also, as I mentioned above, I purchased my kit on Amazon, so I’m going to provide Amazon pricing. These prices may vary a bit between various retailers, but my guess is they will be pretty close.
Here is a breakdown of the kit contents and cost based on the length of the material you purchase.
RV Rubber Roof Kit 5 Feet ($129.95)
5 Feet of EPDM Rubber Roof by 8 1/2 feet
- 2 tubes of Self Leveling Sealant (11 oz)
- 1 Roll of Butyl Tape (30′)
- 1 Gallon of Rubber Roof Adhesive (8010)
RV Rubber Roof Kit 10 Feet ($189.95)
10 Feet of EPDM Rubber Roof by 8 1/2 feet
- 4 tubes of Self Leveling Sealant (11 oz)
- 2 Roll of Butyl Tape (30′ L)
- 1 Gallon of Rubber Roof Adhesive (8010)
RV Rubber Roof Kit 15 Feet ($249.95)
15 Feet of EPDM Rubber Roofby 8 1/2 feet
- 4 tubes of Self Leveling Sealant (11 oz)
- 2 Rolls of Butyl Tape (30′ L)
- 1 Gallon of Rubber Roof Adhesive (8010)
RV Rubber Roof Kit 20 Feet ($339.95)
20 Feet of EPDM Rubber Roof by 8 1/2 feet
- 4 tubes of Self Leveling Sealant (11 oz)
- 3 Rolls of Butyl Tape (30′ L)
- 1 Gallon of Rubber Roof Adhesive (8010)
RV Rubber Roof Kit 25 Feet ($419.95)
25 Feet of EPDM Rubber Roof by 8 1/2 feet
- 4 tubes of Self Leveling Sealant (11 oz)
- 3 Rolls Butyl Putty Tape (30′)
- 1 Gallon of Rubber Roof Adhesive (8010)
RV Rubber Roof Kit 30 Feet ($479.95)
30 Feet of EPDM Rubber Roof by 8 1/2 feet
- 5 tubes of Self Leveling Sealant (11 oz)
- 4 Rolls of Butyl Tape (30′ L)
- 2 Gallons of Rubber Roof Adhesive (8010)
RV Rubber Roof Kit 35 Feet ($529.95)
35 Feet of EPDM Rubber Roof by 8 1/2 feet
- 5 tubes of Self Leveling Sealant (11 oz)
- 4 Rolls of Butyl Tape (30′ L)
- 2 Gallons of Rubber Roof Adhesive (8010)
RV Rubber Roof Kit 40 Feet ($599.95)
40 Feet of EPDM Rubber Roof by 8 1/2 feet
- 5 tubes of Self Leveling Sealant (11 oz)
- 4 Rolls of Butyl Tape (30′ L)
- 2 Gallons of Rubber Roof Adhesive (8010)
What tools and supplies do you need?
Outside of the components of the kit, there are going to be a few tools and supplies that will make this job much easier. Instead of explaining each one and what they do, I’m just going to provide a bulleted list of what I used and as we go through the process you will see how they apply.
- A-frame ladder
- Extension ladder
- Cordless drill
- Bits and drivers
- 5 in 1 scraper
- Folding utility knife
- Flat pry bar
- Paint roller
- 1/4′ nap paint roller head
- Shop broom
Step by Step Process
Step 1: Removing roof components
The first step in this process is removing all the components and accessories that you will find on top of your roof. For my job, it included removing a skylight, vent fan/cover, refrigerator vent screen/cover, vent pipe caps, television antenna, radio antenna, and air conditioner.
It seems like quite a lot to remove, but most of the items are pretty easy. It doesn’t really matter which item you start with, you just have to get it done.
Skylight Removal
I’ve included a video above, but I had already removed the skylight when I recorded it. Either way, it will be an easy task for you to do.
As with most components on the roof, it is going to be secured by a number of fasteners (screws). These screws are probably going to be covered up with a thick layer of lap sealant and whatever else has been added over the years.
In order to get the process going, you are going to need to remove any sealants that are in place in order to access the screw heads. I prefer to use a 5-in-1 tool like the one I listed above. It doesn’t really matter what tools you use as long as you can get the sealant removed.
Once the sealant is out of the way and the screw heads are visible, it’s time to start removing them. Mine had 1/4″ heads, so I simply used a cordless drill and a 1/4″ driver to remove them. There are quite a few to remove, but a cordless drill makes light work of it.
Once all the screws are removed, it will be time to remove the external portion of your skylight from the top of your roof. There is a good chance there is a layer of butyl tape between the top of the roofing material and the bottom of the skylight.
If you are reusing your skylight, you want to take extra precautions not to break or crack it during the removal. Butyl tape is really sticky and depending on how long it has been on there, it can provide a pretty strong bond.
Gently pry around the edge a little at a time being sure to take your time. If you are replacing your skylight, you don’t have to be as careful in removal. Just pry and go.
Vent Fan Removal

Once you get skylight removed, you are ready for the vent fan. It is very similar to the skylight removal.
Work your way around the edge of the fan covering removing any sealants covering the screw heads. Once all the screws are exposed, simply remove them using your cordless drill.

As with the skylight, be sure to gently pry around the edges if you are going to reuse this component. There will be butyl tape underneath the flange of this component as well, so it will probably be pretty stuck in place. If you are replacing it, you don’t have to be as careful.

Now that the vent fan is removed, let’s move on to the vent covers.
Vent Pipe Cover Removal


Your vent covers will be more of the same. Mine had 4 screws per cover and the screw heads were covered with lap sealant. Remove the sealant, expose the screws and remove, and take off the caps.
Antenna Removal

Let’s move on to the antennas. Both the television antenna and radio antenna are going to be affixed like the previous components, with an exception.
Remove any sealant covering the screws and remove all screws. Again, gently work your way around each antenna prying it loose from the roof surface.
Once removed, you will see where each antenna will be connected to its respective cable. These will need to be disconnected, but it is as simple as searching along the cable until you find the “connection”. Unscrew the cable at the connection freeing the antenna for removal.
Mine removed a bit differently because the roof was completely rotten underneath. On top of that, I completely removed my TV antenna from my RV and did not plan on replacing it. You can see the water damage in the video above.
Refrigerator Vent Cover Removal
The refrigerator vent cover has an external shroud or cover that fits on top of the screen. This cover has 4 recessed screws, which are filled in with lap sealant.

Use the 5-in-1 tool, or something similar, to remove the lap sealant out of each recess exposing the screw. Once the sealant is out, you may have to use and extended bit to access the phillips head screws. Remove all 4 screws and take off the cover.

Now that the cover is removed, you are going to have to remove more sealant. There is a series of screws securing the screen covering and they will be covered in sealant. Remove the sealant and the screws. Now that the screws are removed, pry the screen cover off the roof.

Air Conditioner Removal
There are a few more steps to remove the AC, but it is still a pretty easy task. The first thing you need to do is remove the AC face cover inside the RV. There are 4 small screw coverings that can be popped exposing the screws. Remove these 4 screws and the face cover will come off.

There will be 4 long screws, one at each corner of the mounting bracket holding everything in place. Remove each of these long screws freeing the lower half of the AC from the top half on the roof.

At this point, the electrical will be the only thing connecting the lower half and the top half. There two connections that will need to be disconnected. One is a bundle of wires with a clip attachment. It’s easily accessed on the outside of the unit. These wires will connect the lower half from the upper half. Go ahead and disconnect this bundle using the clip.

There are two more wires connecting the top half from the bottom half. The clip securing these wires is hidden behind a panel in an enclosed area of the unit. Follow the wires from the top unit to where they go into this enclosed area. There will be a plate secured with one screw, which allows access to the interior. Remove this plate and unclip the wires.


The two halves are now disconnected from one another and you can let the bottom half hang. It is not time to head back up on the roof and remove the top half.
Once you’re back on the roof, you just need to work your way around the unit prying upward on each side. You can feel is releasing from the roof and it will eventually work free. There is a gasket between the AC and the roof which prevents any moisture from working its way in. This gasket can sometimes form a sticky bond that will hold the AC in place. This should be the only resistance you feel.

Now that the AC is disconnected you will probably have to solicit some help to get it off the roof. I had to rig up a way to get it down by myself and it was a bit of work. The last thing you want to do is drop this unit from 10′ off the ground.
* DISCLAIMER: Do not perform any electrical work you are not comfortable with. I’m not an electrician and only worked with the electrical after making sure there was absolutely no power to the RV. When in doubt, have a certified electrician perform this work. *
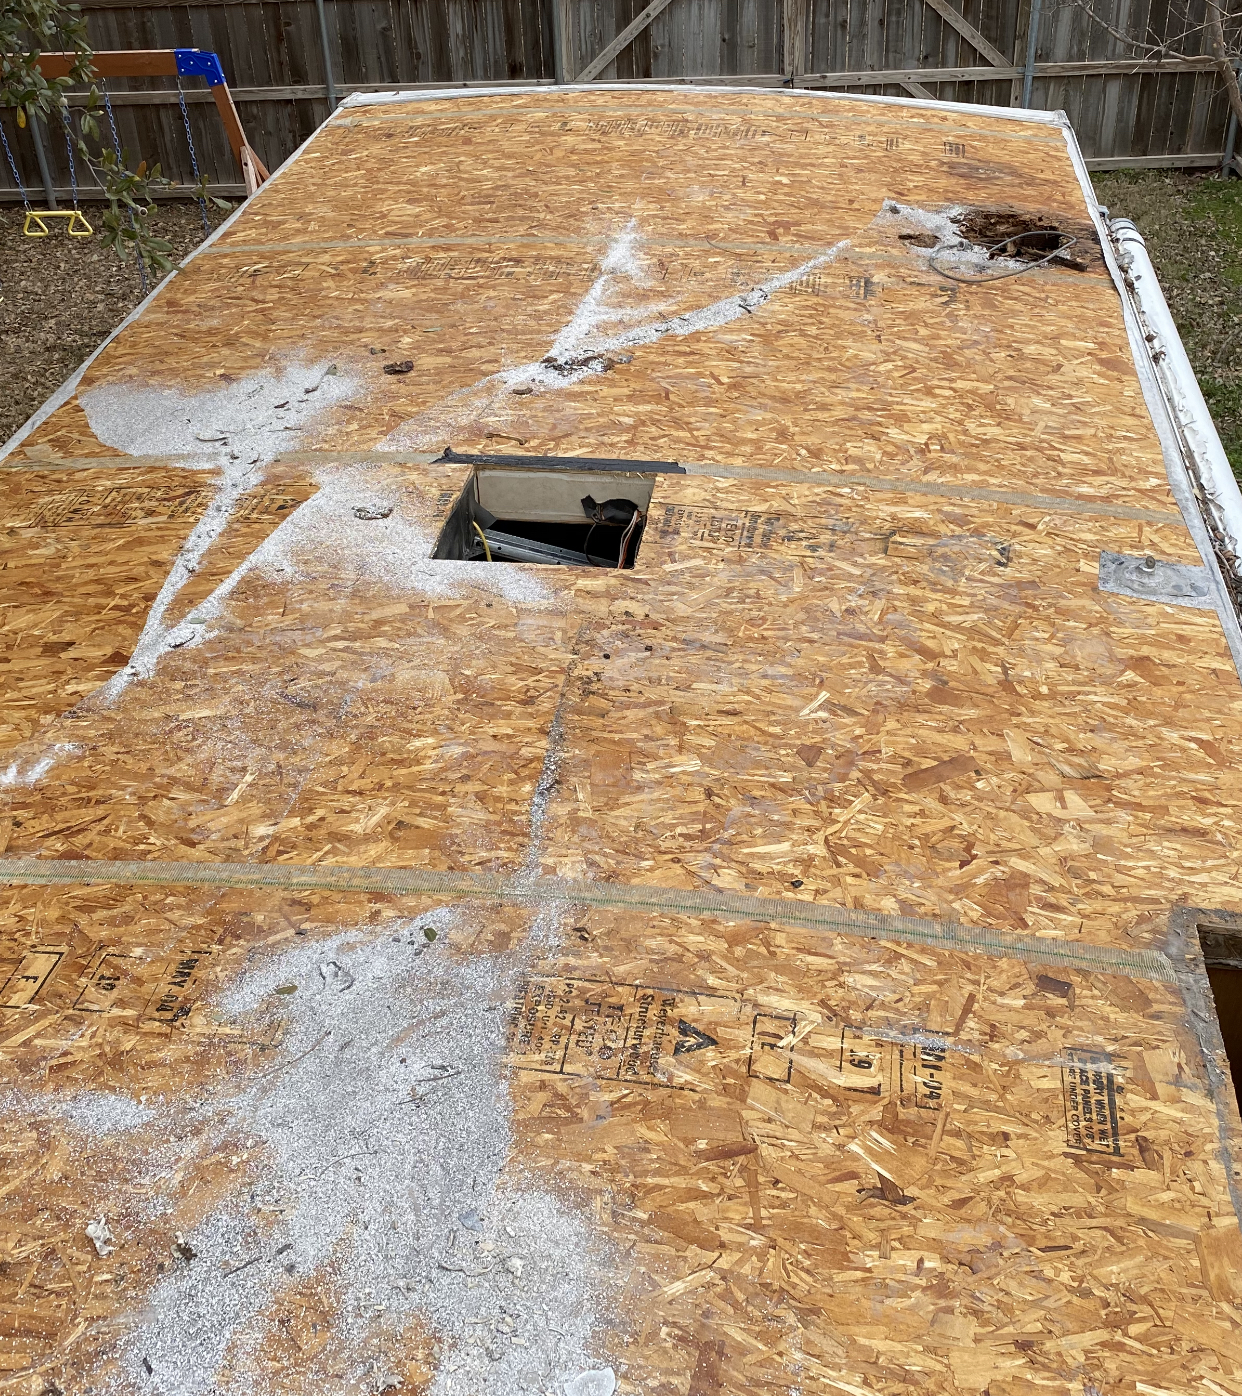
How to remove old roofing and trim
Now that all of the “stuff” is off of the roof, we need to remove the rubber roofing and trim. To be honest, you can do this in any order and it’s kind of personal preference. Let’s take a look at how to do it.
I removed the rubber roofing material before I messed with the trim. In order to do this, I just used a utility knife and cut around the edges freeing the roofing from the trim.

One I scored around the trim, it was time to start peeling up the roof. I got lucky and mine peeled off in large chunks. Once a section got too large to work with, I used my utility knife to cut it off. I worked my way around the camper until all the material was removed. It took about 15 minutes total.

Now that the rubber roof was removed it was time to remove the trim and termination bars. This is not a hard process, but it does take a little time.
The termination bar on the back of the camper is mounted on the vertical portion of siding just below the edge of the roofline. The channel, which contains the screw heads, has an insert that provides moisture protection for the screws. This insert needs to be removed.

The insert on mine was pretty old and deteriorated, but I was able to get it removed pretty easily. The 5-in-1 tool really made this easy to do. Once the insert is removed, grab your cordless drill and 1/4″ driver and remove all the screws.

There will be a layer of butyl tape between the trim piece and the siding of the camper. Gently pry it off being careful not to bend or deform it too much. You may misshape it a little, which is okay. We just want to minimize it as much as possible.

Repeat this same process on both sides, following the steps above. There will be a lot of screws and more butyl tape to deal with. Nothing fancy here. Just keep grinding along.
Now that you have the back and side trim removed, let’s remove the top portion of the vertical trim found at the back of the camper. You will have a vertical piece of trim covering each corner running top to bottom. Remove the insert and enough of the top screws to free up the rubber roofing.
We are on to the final termination bar. This piece actually runs horizontally across the front portion of the roof. The aluminum siding wraps over the front edge and onto the roof and this piece secures it to the decking.
It is held in place by a lot of screws, you guessed it, the channel the screws are in will more than likely be filled with lap sealant. Use your trusty 5-in-1 and remove enough of the sealant to expose the screw heads and remove them.

Once all the screws are removed, you can use your pry bar to gently work your way across, removing the termination bar and loosening the siding.

While you are up top, go ahead and remove the top portion of the vertical trim found at the front of the camper. Do the same thing you did at the rear, removing enough of the top screws to free up the rubber roofing.
That is it, your rubber roofing and trim are removed. Let’s prep the roof.
How to Prep the Roof
There’s not a whole lot to do here, but attention to detail will pay off.
The first thing you want to do is inspect your roof for damage. If there is any water damage you will need to repair it before moving forward. We aren’t going to get into the details of that in this guide, but we will cover it in another article.

Once you’ve given your roof a visual inspection make sure any screws, stables, etc., are flush or recessed into the decking and not creating any high spots.
You will also want to check any seams or depressions in the wood that may need attention. For the seams and edges on my roof, I used Gorilla tape as an extra layer of protection. I covered all the seams where there was a chance of the roof being unlevel. I also covered all of the sharp edges the roofing material covers. A little time and a little expense go a long way.


You’re also going to want to sweep or blow off the entire roof making sure there isn’t any debris or other “things” on top. You don’t want anything between the decking and the EPDM.
I swept everything the best I could and then I got out the blower. I ran the blower across is several times just trying to make sure I got everything off of there. It seemed to work pretty well.
Now it’s time for installation.
How to install the EPDM roof
Installing EPDM

You are now prepped and ready for installation. Start by laying out the entire sheet of EPDM on the roof of your camper. This helps get everything lined up and helps relax the material.
Once it is laid into position, you need to decide how much of it you want to glue down at one time. Some folks do half a time and some do much less. I chose to break it up into smaller sections and it seemed to work pretty well for me.
Once you decide how much you want to glue down at once, it’s time to fold back a portion of roofing material. Once it is peeled back, you are ready to apply the acrylic adhesive. My kit came with RecPro RP-8010 acrylic water-based adhesive.

After thorough mixing, pour the adhesive onto the decking and use the roller to apply the adhesive. I used a paint roller with an extension fitted with a 1/4″ nap roller head to apply an even coat of adhesive. Allow the adhesive to sit for a bit before positioning the EPDM material back into place.


Slowly work the EPDM material into position to minimize air pockets and wrinkles. Continue repeating this process as you work your way across the RV roof.
If you discover air pockets that need to be addressed, now is the time to fix them. The glue allows you a little time to reposition the material if needed, so be sure to take advantage of it. Any small air pockets can be addressed with a squeegee or shop broom. This also allows the roofing material, decking, and adhesive to form a nice smooth bond.
Congratulation, you have now successfully installed your brand spanking new EPDM roofing material. But wait, we’re not done yet.
Cutting Vent Holes

Let’s go ahead and cut out all of the roof vent openings while we are up top. Use your utility knife to cut an “X” in each vent or accessory opening, running from corner to corner. Take a hole punch and round out the ends of each cut to prevent the cut from running.

Pull the flaps down into the opening and staple them securely into place. Once they are stapled and secured, use your utility knife to trim off any excess EPDM.
Installing Termination Bars and Trim

Let’s go ahead and secure all the roof edges. It’s time to reapply all trim pieces and termination bars we removed earlier in the process. Be sure to apply a nice even layer of butyl tape the entire length of each piece. When securing the trim, pull down the EPDM membrane to create a tight, but not stretched, fit.


Once the butyl tape is installed, reattach the trim using your cordless drill and the proper screws. Start from the middle of each trim piece and work your way around the entire RV completing this process. Now it’s time to seal up all the trim by using sealant on the front and rear termination bars.

Cut excess roofing material from underneath the trim to create a nice, finished look.
Installing Roof Accessories

Reinstall the vents, skylight, covers, antenna, and air conditioner by reversing the removal process. When installing these items, be sure to apply butyl tape to the contact surfaces and secure with the proper fasteners.
Now use lap sealant to cover all screw heads, edges, etc. The bottom line is that you need to make sure all avenues for moisture to get in are sealed.

Well done…you made it! With all the hard work behind you, it is probably a good idea to know how to maintain your new EPDM roof.
EPDM Roof Maintenance
Proper maintenance of your EPDM roof is important for trouble-free usage. Normal maintenance is simple and easy
Dicor recommends the following:
Keep your roof clean
Clean your roof at least four (4) times annually.
Normal Cleaning
Use Dicor Rubber Roof Cleaner RP-RC160C concentrate to clean complete roof or RP-RC320S ready to use cleaner in a spray bottle for smaller areas. (See CAUTION below.)
Rinse the complete roof with clean water to remove any loose dirt or debris.
Using a medium bristle brush, along with the cleaner mixed with 2 or 3 gallons of water, scrub the entire roof. Rinse thoroughly with clean water to avoid residue build-up on the roof or sidewalls of the vehicle.
For more difficult stains, you may use RP-RC160C in its original concentrated form. For stubborn stains, use a cloth dampened with mineral spirits. DO NOT use mineral spirits in a large area or allow it to soak into the membrane.
CAUTION
DO NOT use cleaners or conditioners containing petroleum solvents, harsh abrasives, or citric-based cleaners. You may cause irreparable damage to your roof and/or may void your warranty.
Use caution when working on top of your vehicle. The wet membrane may be extremely slippery.
Beware of areas where fruit, tree sap, or harsh environmental fall-out may stay on the roof for an extended period of time. These conditions may result in irremovable stains. If you are in these conditions, you may have to increase the frequency of your cleaning.
Additional Information
Dicor EPDM roofing membrane is specially formulated for exposure to the sun and natural elements. However, it can be cut or punctured by sharp objects.
Use caution when placing any articles or walking on the roof. If damage does occur, the membrane can be easily repaired using Dicor’s #401-PR or #402-PR roof repair kits. Contact your local dealer or Dicor Corporation.
Cleaning lap sealant used around roof mounted accessories and railings: If soap and water do not clean the seal to your satisfaction, use a cloth dampened with mineral spirits to wipe away dirt build-up on the seal.
Repairing lap sealant or adding sealant: If, after a period of time, the lap sealant needs touched-up or additional seal is needed, use a cloth dampened with mineral spirits to eliminate all foreign materials from the surface of the seal, let set for at least 15 minutes and apply Dicor lap sealant (#501LS, #502LS, #551LS) directly over the existing seal – allowing the new sealant to touch the EPDM and/or accessory surface.
If additional UV protection is desired, apply Dicor’s RP-RG320S Rubber Roof Guard Protectant immediately after cleaning.
Conclusion
Take a deep breath…I know you just read through a lot of information, but it’s not as bad as it seems. Especially, when compared the cost of hiring someone to do it.
Make sure you have all your material handy and solicit another set of helping hands if you can. It will greatly cut down on time and effort.
Be methodical in your process and don’t rush anything. You want this new roof to last as long as possible. In addition to that, you want to make sure it is watertight for years to come.


13 Responses
Hey man, this is the most helpful resource I’ve seen. Thank you. I’m renovating a 30 ft for the first time which involves a complete roof repair.
How has your RecPro Superflex RV Rubber Roof Kit held up over time?
Hi Josh,
Thanks for the note and I’m glad you found some value in the article.
The roof kit has held up great. I make it a habit to now inspect my roof regularly and I haven’t noticed any issues thus far. I feel pretty confident it’s going to hold up very well.
Again, thanks for the message, and feel free to reach out anytime.
Take care,
Sir, thank you for this very informative description. I’ve been avoiding replacing the epdm roof on my 16 yr old forest river but after reading through this I think I’ll go for it.
I appreciate all the work you put into this.
How did your project go? I feel confident you can knock it out. Thanks for the kind words!
Very nice! You’ve given me the confidence to do this myself. They want $5000 to replace the roof at my campground. What is the “trick” for cutting the epdm at the roof vent pipes? How are you doing this? Laying it out dry first then marking with a small cut at the pipe and then making the hole bigger? Thanks for any advice on this. The rest of the job looks very do-able and will save me thousands!
Hi Randy, I hope I answered your question in the other response. It’s shocking how much they want to charge for these repairs. I don’t understand the high cost. The way you just described it is pretty much the way I did it. I have confidence you can tackle this project.
Excellent resource for a “do-it-yourselfer!” Thank you so much for the very detailed writeup. Are there any tips for cutting the vent pipes into the roofing material? I want to make sure the locations are correct and I don’t want to screw that part up. Thanks again and remodelyourrv.com is a great source of information! Keep up the good work!
That part made me a little nervous as well. Once I started laying it out I stretched it over the pipes the best I could to get a mark where to cut. That’s the best way I could figure out how to do it. It seemed to work pretty well.
How long should the job take on a 30’ RV?
materials and tools needed for the complete job
Thank you very much for your detailed information and excellent (easy to follow) videos. I purchased a 2017 with a skylight (unbelievably cheap material) leak that caused roof rot on previous owner. This has turned into a large project but I am a seasoned DIY’er and have jumped into it head first. I am going to replace the entire California-sun baked TPO (plastic … don’t let them fool you) roof with the-real-deal EPDM. I will likely use one of the roof kits that you reference here. Thanks again man.
Loving that I’ve come across your video, just got blind-sighted by a purchase with “no leaks” that, as you guessed it, leaks a lot. I’m looking at redoing the entire roof and trying not to be overwhelmed. I purchased a 2017 Dutchman Classic 26′. Looks very much like this one, so I’m hoping that with the elbow grease and determination, this will work out for me too!
My used fema camper roof has rot in areas and I cannot pull up roofing (edpm?)
The rotten wood areas come up no problem, but is hardened on the good wood parts. What is the best less-stressful method to pull this off??