If you are new to RVing, it may be confusing to understand what your holding tanks do, how to maintain them, and even that there is a proper sequence to empty them.
There are things you can do to ensure they last longer and continue working properly. This includes the valves that keep them closed and locked tight. Drips from your black water tank, for example, can lead to a nasty experience for you as well.
Having a valve fail completely is a catastrophic accident of epic proportions. This is not something that you want to happen. It is a nightmare and an embarrassment.
Trust me, you don’t want it to be you sitting there at the rest area, as the crowd gathers and people start swearing at you. It happens.
People have also been pulled over by local police who have witnessed dripping from tanks.
As you can see, it’s really important to keep them functional and in good condition so that you don’t have a failure. They’re also ridiculously expensive to have replaced, so you want them to last a long time as well.
What’s the Difference in Black Water and Gray Water?
The main thing you really need to know is the difference between these two terms and which tanks are gray water and which tanks are black water.
Confusing the two can be a very bad situation if you open the wrong one at the wrong time.
Gray Water Tank
The gray water tank on your RV is the tank that catches and stores the water that comes from your shower and your kitchen sink drains.
If you are careful to use soaps that are environmentally friendly, you can dump this water out on the ground in most places, but make sure you check first.
Some states have regulations against it. In a nutshell, gray water is just dirty, soapy water.
Black Water Tank
The black water tank in your RV is the tank that catches the flow from your toilet.
This tank must be dumped in a proper dump station or into a ‘honey wagon’ that comes around and empties tanks in campgrounds.
You can also get a portable honey wagon that is a rolling septic tank that you can dump your tank into and then roll it to the dump station without needing to move your camper.
Black Water Valves and Gray Water Valves

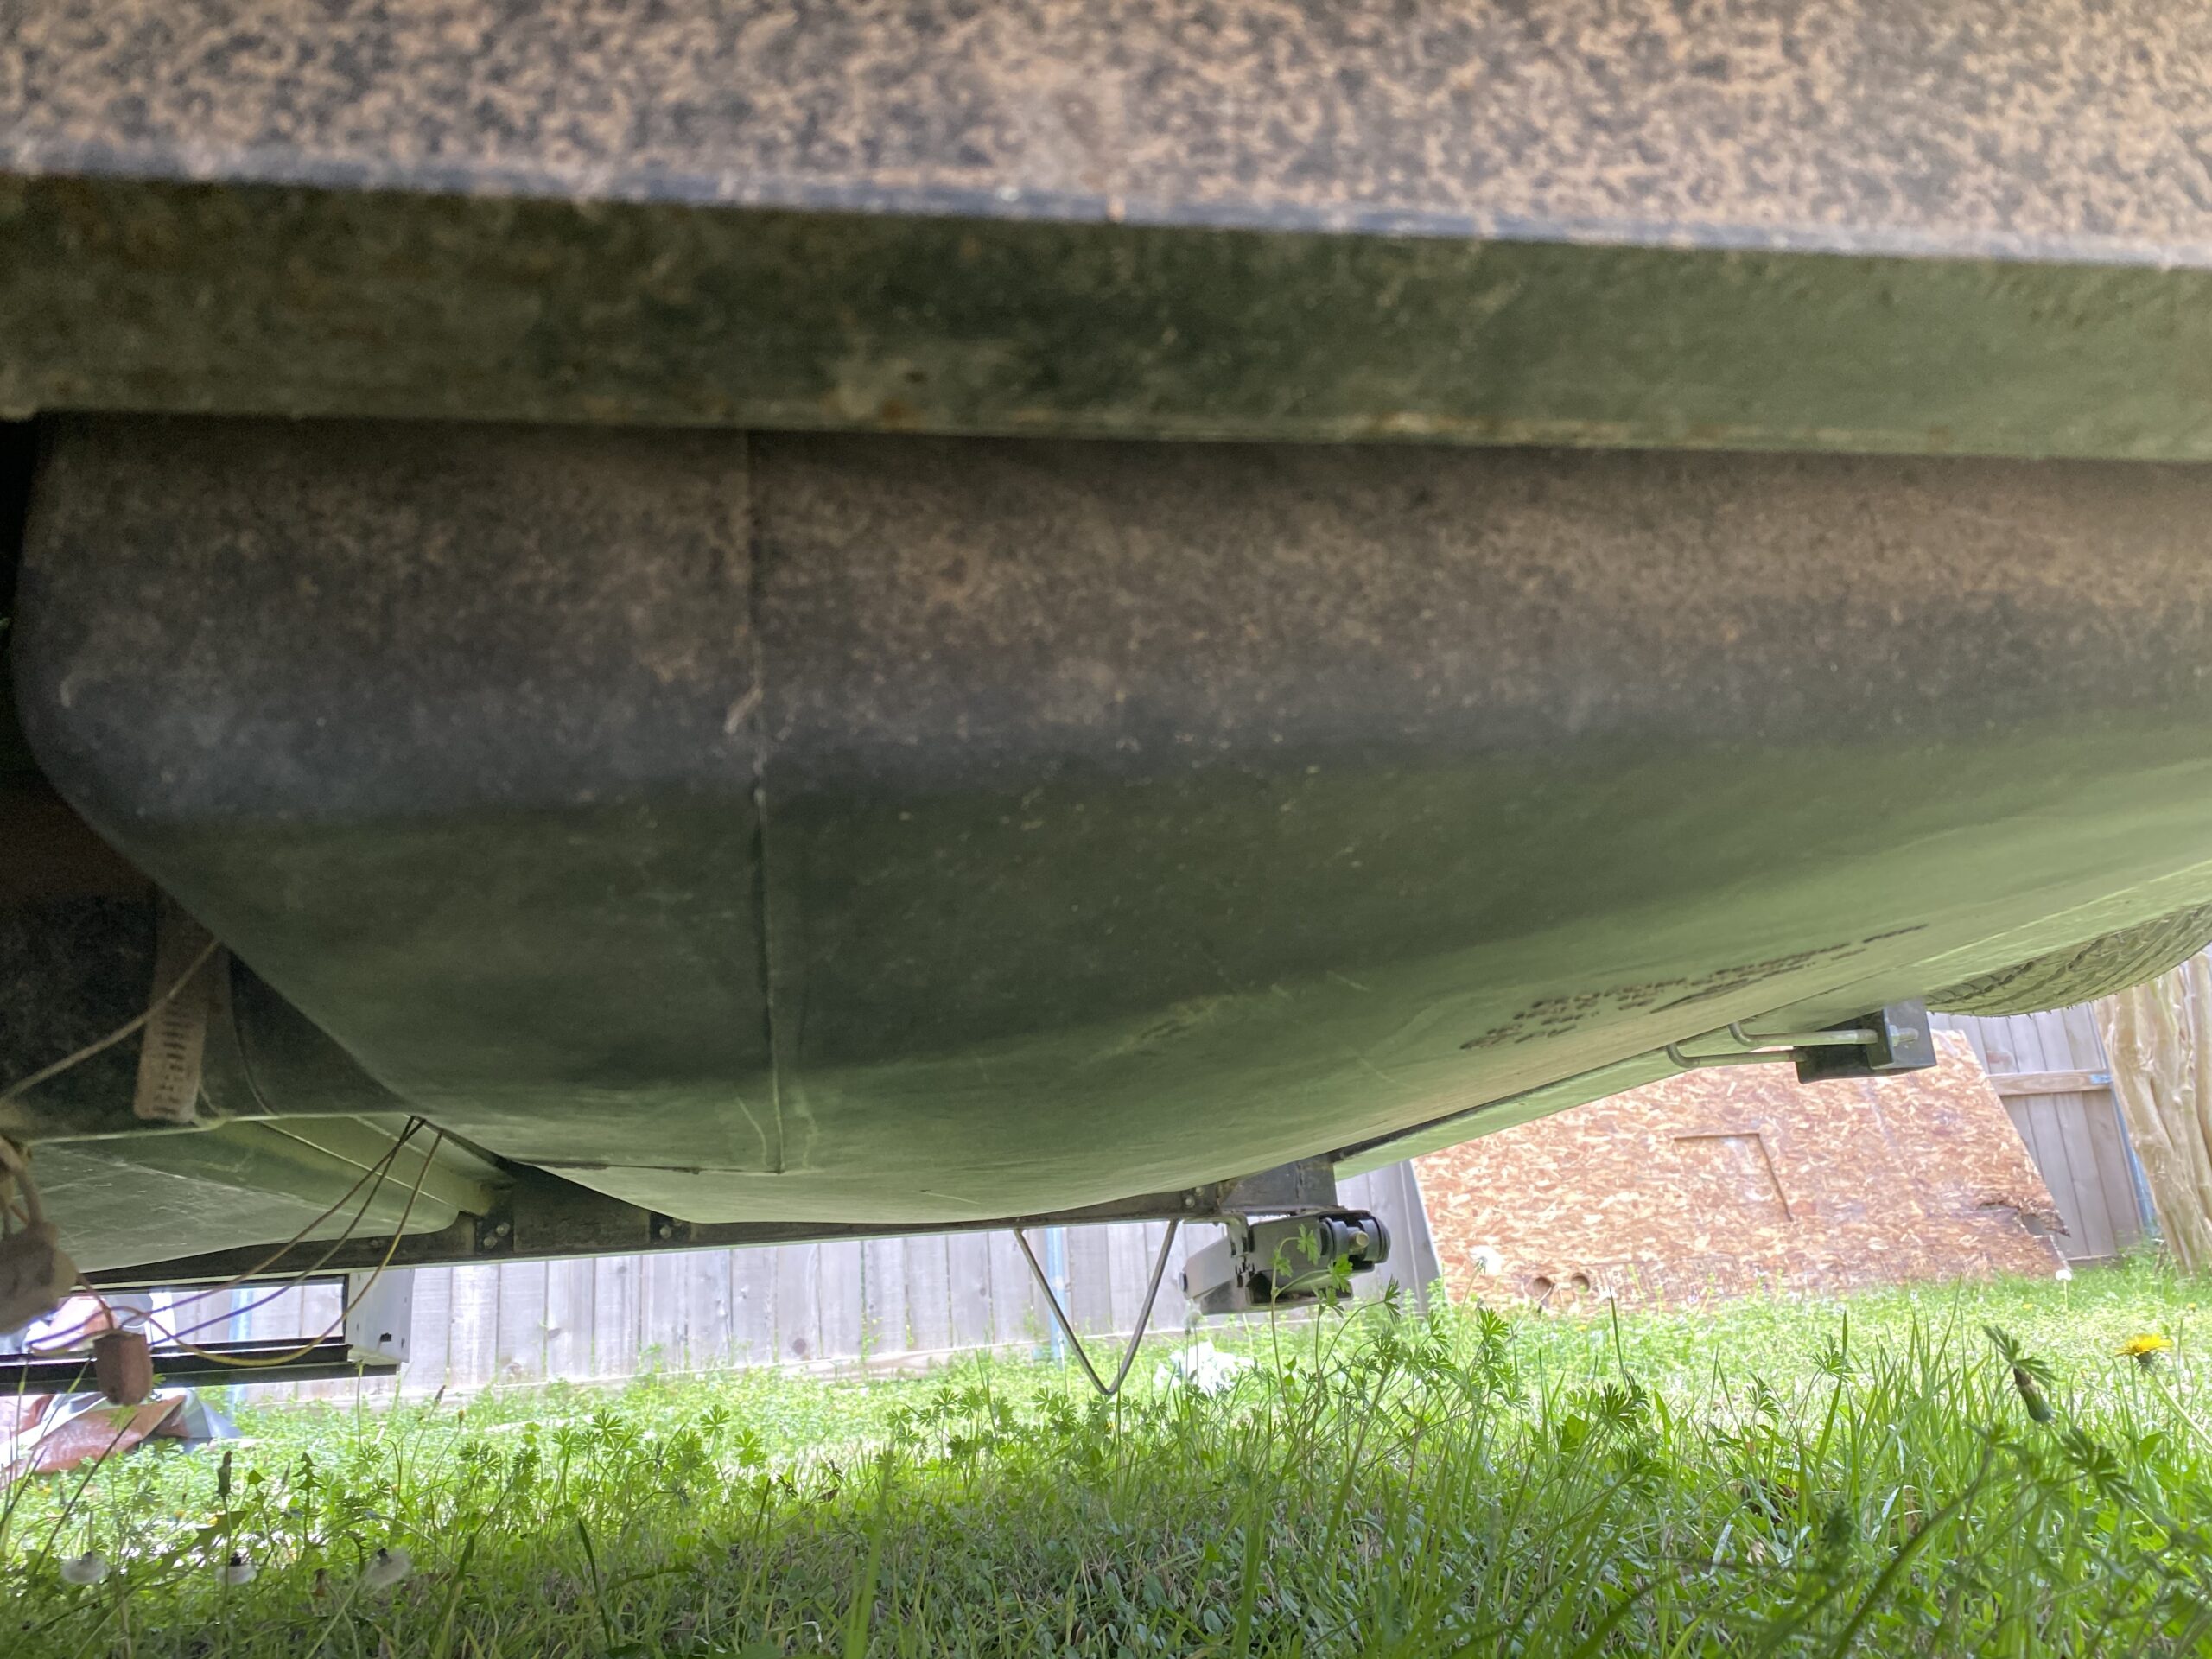
If you are ever unsure which valve is which, you can usually look underneath your camper and figure it out.
The one that splits into two locations is the gray water line and the one that comes straight down, in a solitary fashion, will always be your black water line. You can also refer to your owner’s manual if you’ve got it handy.
The valves are actually quite simple in the way they work and need to be maintained and replaced every few years because they do wear-out.
You will find them on the exterior of your camper, typically ⅔ of the way back, on the driver side of your rig. They may be visible under the camper and some are designed to be behind a hatch door.
If you are a DIYer, you can replace your tank valves fairly easily. If not, take the camper in and have them replaced before they become an issue.
If you have one that starts sticking, you can spray a bit of lubricant on it to help loosen it up. If you are out camping and this happens, and you don’t have WD-40 with you, try using a little cooking spray. Most of you will have that in the camper.

These are critical because if black water drips, it is a human waste issue that can be considered hazardous material.
You can get fined in most states for this, not to mention the fact that you’re contaminating your campsite. This is a bad thing for all involved, including the next people who use your site.
Valves should be lubricated to keep them functioning properly and tested frequently when you are empty, to ensure they are functioning well prior to leaving on a camping trip.
How Do You Know Your Tanks Are Full?
Most campers are equipped with a control console that monitors your tanks and your battery levels as well. If you have a newer camper, these are likely digital and easy to ready, as well as being reliable.
Older campers have more issues as they age and it is not uncommon for the floats in the tanks that track the levels to stop working. They can get corroded with gunk and lose accuracy over time.
A good rule of thumb is as soon as you smell something funky in your sink, it’s time to empty your gray water tank.
Your black water tank will also begin to smell bad. It can get really nasty in hot weather. If you can, try to let your black water tank get to about 2/3 full. This allows gravity and pressure to do the work when emptying and it also gives the solids a little more time to break down.
For your black water tank, you also will need to buy odor neutralizers that you add to the tank after you empty it each time. A lot of the options assist in breaking down the tissue and the waste, which helps the system overall.
This method works best when you also add a few gallons of freshwater into the tank before you use the toilet.
It isn’t advised to use your holding tanks when the weather outside is below freezing. Understand that the contents in the tanks, as well as the valves, can freeze. This can cause cracks in the tanks and in the valves, causing costly repairs and leaks.
Emptying RV Tanks

Another thing to remember is that you should also empty your tanks in the proper order. When you pull into a dump station at a campground or roadside station, you need to hook to your black water tank and empty that first.
Then, after your black tank has been completely emptied, open your gray water valve completely so that the soapy gray water can rinse your line from fecal waste and wash it relatively clean.
After you disconnect your portable line, use the water hose at the dump station to run water through your dump line before returning it to where you store it.
Also, hook to the city water line and run some clean water through your black water tank, via the toilet, for a few moments. This will help keep deposits flushed from the bottom. Keeping your tank cleaner will ensure that it lasts longer!
Finally, close your tank and continue to run a few gallons into the tank and go ahead and drop a septic pack into your tank right away before you forget.
How to Properly Store Your Camper
When you store your camper for the winter and off-seasons, it’s important to winterize your tanks and water lines. There are special additives you should purchase that will prevent water from freezing in your lines.
You need to purge all the water from your systems and empty your tanks. Having the antifreeze made for RV plumbing is an essential part of ensuring your lines and your tanks don’t spring leaks due to freezing.
Some websites tell you to use bleach water and run that through your system to sanitize it. Be careful if you do this!! Bleach can actually damage your system and your tanks if used improperly.
Bleach is quite corrosive. I could contribute to dry rot issues and your water lines won’t like it very much either.
For a safer alternative, you can use sanitizer made for RVs. This way, you’ll be sanitized the safe way and you don’t have to worry about it.
When you store your camper for the season, practice these methods of purging the system. Follow the advice of your owner’s manual and completely empty your hot water heater, which must be done manually.
Access the door to it on the outside of your camper and open the valves to purge the water completely. This can help your hot water heater last years longer.
So as you see, it isn’t entirely about your septic system. Your unit systems are all a bit tied together when it comes to water flow.
Emptying Your Tanks Is No Big Deal
It may seem like the grossest thing you’ve ever done in your life. The truth is if you thoroughly rinse things each time, take the steps to empty and rinse your tank, winterize properly, and keep things functioning properly, it just becomes another chore you get used to.
Be sure to wear gloves so your hands are not exposed to the nasty stuff like germs and bacteria. Disposable gloves are the best option and can be discarded after use.
Rinse everything properly. Put everything back where it belongs each time so emptying is simple.
Ensure that you empty your black water often enough that it doesn’t have a chance to get really disgusting. What I mean by that is simple – don’t use your camper for a weekend, drive home and not empty the tanks until you get ready to go camping next month.
If you do that, whether the tanks are full or not, you are going to be knocked off your feet by the smell of the growing bacteria in your tank. It will linger for a long time. Don’t make this mistake. Empty often, rinse thoroughly and follow best practices for sanitizing.


