Recreational vehicles (RVs) are extremely popular in the United States, and more than 11% of US households own one; owning an RV may make for fun vacations, but it’s also a huge commitment.
Aside from the money needed to buy and operate one, owners need to commit to regular maintenance to keep their rig in good working condition.
Part of that regular maintenance is keeping an eye out for water damage.
Checking an RV for water damage involves watching for clear indicators like puddles or wet carpet, and also more specifically checking the walls, ceiling, and the rest of the exterior and interior. Consistently monitor your RV because fixing it can be expensive and water damage can spread quickly.
The rest of this article will discuss the specifics of water damage. You’ll learn why water damage happens and the problems it can cause. You’ll also learn what parts of your RV are especially vulnerable and how you can inspect your vehicle inside and out for signs of water damage.
Why RVs Are Vulnerable to Water Damage

RVs are exposed to a wide variety of weather conditions during everyday use, including rain, snow, hail, and sleet. Even when you’re not actively traveling through such weather, the chances are good that your rig is still parked in a location where it’s getting wet.
This constant barrage of wet weather naturally leads to the possibility of damage. It’s important to locate any leaks as quickly as possible so that you can fix them before they create mold or mildew problems within your RV.
Water damage can be caused by inside sources as well; with a kitchen sink, a bathroom sink, and a shower, there are plenty of ways for leaks to happen. Whatever the source, water damage can ruin carpets, cabinets, and other furniture.
If you live in a climate with consistently high humidity levels for all or part of the year, this can potentially cause mold or mildew, or even cause issues inside the ceiling and/or walls if there are any places where the moisture can sneak inside.
Indoor humidity can also be increased via cooking, showers, drying clothing indoors, and other everyday activities. Your RV’s air conditioning will likely be effective at keeping indoor humidity levels down. Noticeably high indoor humidity may also be a sign of exterior leaks.
Ideally, you want indoor humidity to be somewhere between 30% and 60%. You can reduce humidity by utilizing vent fans, opening windows to let in dry outside air, and not hanging wet clothes or towels to dry inside. A dehumidifier may also be helpful.
Why Water Damage Is a Problem
Water damage happens to most RVs at some point in time; why is this such a problem?
Water damage is an issue that spreads. What starts as a small leak can end up spreading across the roof, down through the ceiling, or into the walls.
Water damage around windows or doors can affect how those fit into their frames, which can then lead to even more water seepage.
Water damage inside the RV can ruin carpets and other floorings. Water leaking in through the ceiling can damage cabinets and other things attached to or hung on walls.
Water leaks in the bathroom can damage the areas near toilets, sinks, and showers, and the plumbing fixtures themselves.
Some insurance providers cover water damage. Others do not, and still, others might cover only a portion or certain types. But regardless of whether you’re paying for repairs or your insurance company is, the costs multiply fast; it’s important to catch problems early to keep repair costs as low as possible.
How Often You Should Check for Water Damage

You should check your RV regularly for any signs of water damage, especially if you use it frequently.
If you tend to use your RV frequently during one season of the year, such as during the summer but leave it in storage for the remainder of the year, plan to check it at the beginning of the season and again at the end at a minimum. Consider also checking it once mid-way through the season.
A better guideline, perhaps, would be to give your RV a thorough once-over four times a year at the beginning of each season. This will help ensure you find any new issues quickly and can make repairs right away.
If you live in your RV full-time, you will want to be checking out your rig’s integrity even more frequently. Consider conducting regular inspections to look for the most obvious signs of water damage once a month, or perhaps even more often.
In addition to regular inspections, if your RV is ever exposed to any major storms, it’s smart to check for damage immediately after. Large amounts of rain, strong wind, and possible flying debris (sticks, rocks, etc.) can cause surface damage that would allow water to leak in or lead to delamination in the walls.
Preventative Tips to Avoid Water Damage
While regular inspections are important to stop leaks early and deal with water damage before it becomes too prolific, there are also things you can do to lower your chances of encountering damage at all:
- When traveling with your RV, be aware of the area where you’re driving and of your overhead clearance. Avoid driving under low-hanging branches that could cause scratches or dents. Definitely do not drive under signs or other structures that your rig cannot properly fit beneath.
- Avoid parking beneath trees when possible. Falling branches, pinecones, nuts/seeds, or sap can damage the paint and possibly lead to structural damage over time.
- Drain your RV’s hot water heater before longer-term storage, and if your unit has a bypass valve, use it.
If you live in a climate where winter temperatures drop below freezing, be sure to winterize any of your vehicle’s pipes, especially around the water heater.
Potential Signs of Water Damage
How do you tell if your RV might have water damage? Some of the more general signs include:
- Rust on metal parts/items
- Rust around windows or light fixtures
- Damp carpets
- Any discoloration on walls, ceiling, furniture, or floors
- Soft or spongy areas on walls, cabinets, ceiling, or roof
- Indentations or bubbles in walls or floors
Regular inspections are the most important step you can take to prevent or minimize water damage. Make sure you check every inch of your rig, focusing especially on areas that are more prone to leaks.
The next section will go into more detail on exactly where you should be inspecting and what you should be looking for:
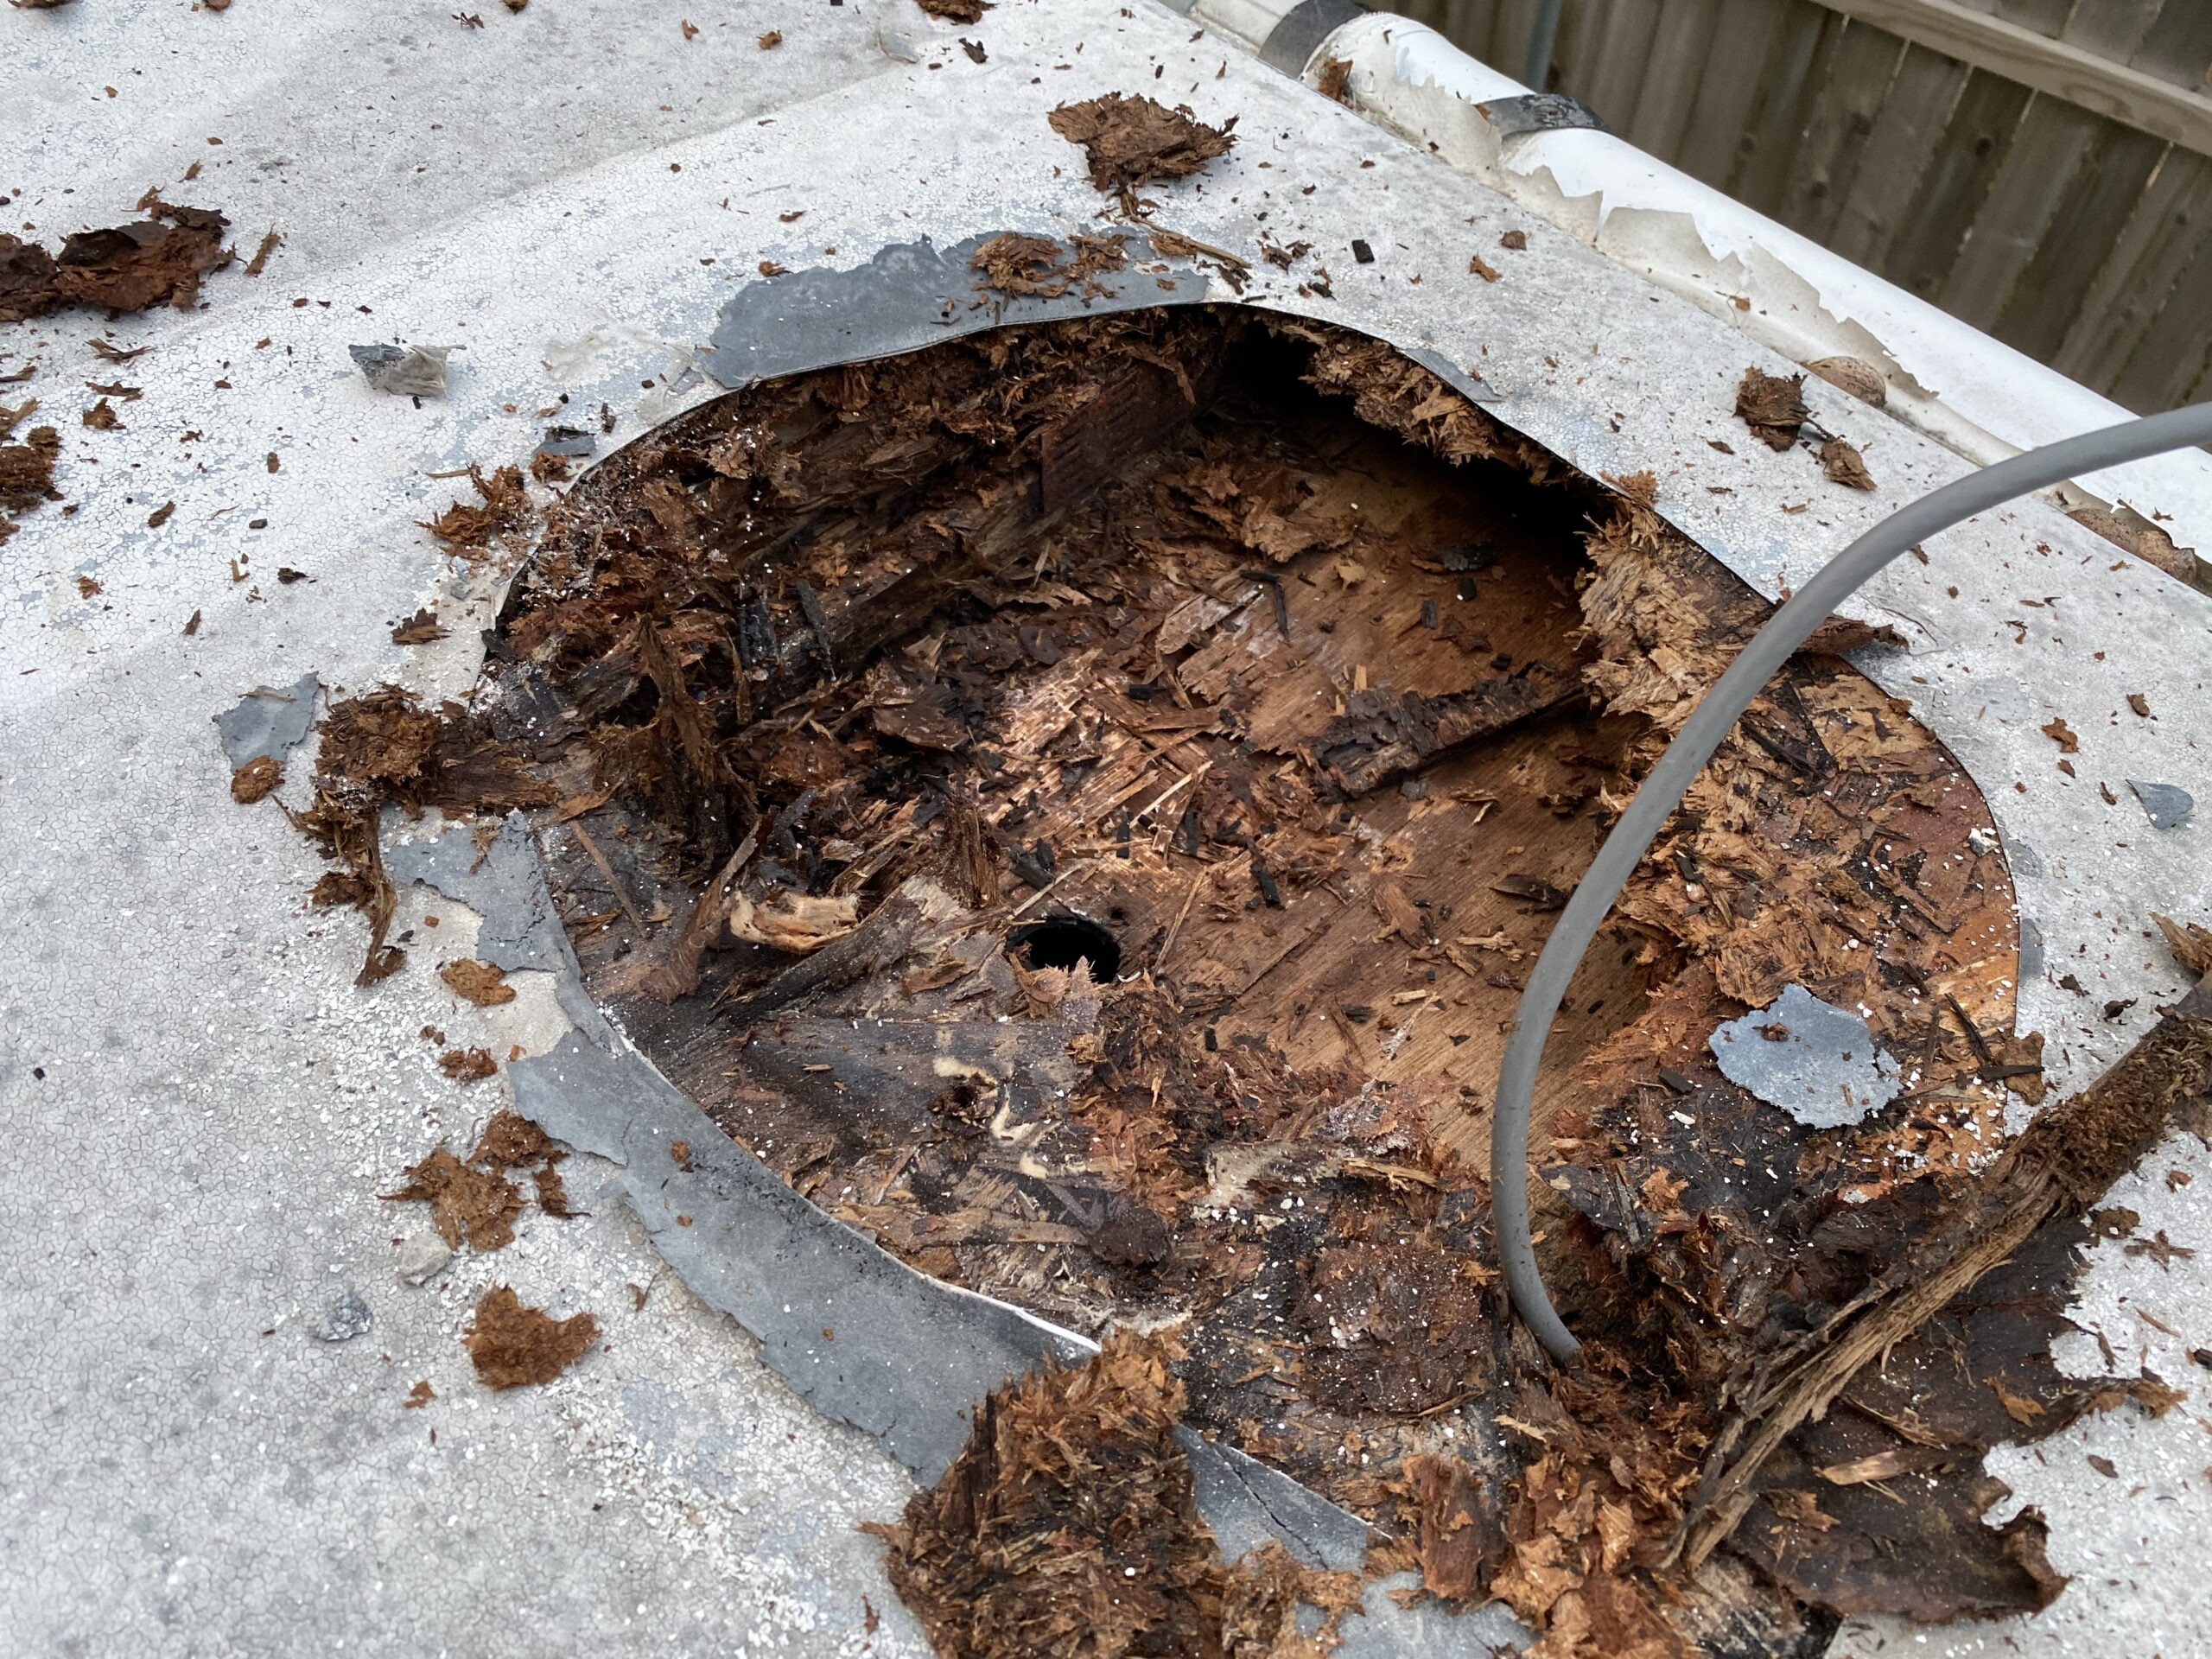
Roof
The roof is directly exposed to huge amounts of water due to rain and other wet weather, so it’s one of the most common places for water damage to occur.
Not all RV roofs are safe to walk on, so be sure to keep this in mind before climbing on top of yours. It may be necessary to place support beams across the walls that can safely support your weight.
When inspecting the roof of your RV, follow these steps:
- The first step is to physically get up there and look for any obvious signs of damage. Holes, cracks, or tears in the roof material are all signs of damage that necessitate immediate repairs.
- Don’t just rely on your eyes, either; run your hands along the surface to feel for damage (cracks, dents, or other irregularities) that might not be readily visible.
- Next, check any seams or seals on the roof. While many modern RVs are built with single-piece roofs, not all are. If yours has any places where roof pieces are joined together, it’s important to check these seams to make sure they’re still solid and watertight.
- Look for cracks in the sealant or materials that otherwise seem worn out, and feel for soft spots. Discoloration is another potential sign of damage.
- After that, it’s time to inspect any vents located on the roof, as well as any solar panels, roof racks, antennas, or other items attached to the roof. Look for cracks or other exterior damage where these are attached to the roof itself, and feel for soft spots.
Ceiling

The ceiling is one of the most common places where water damage is found in RVs. Examine the ceiling in each room of the RV very, very thoroughly.
Pay special attention to areas close to any roof joints, areas beneath antennas, or where anything else is attached to the roof, and the corners, where the ceiling is joined to the walls.
Signs of damage you should look for:
- Discoloration, cracks, or holes are all red flags. Soft spots and bubbles are also signs of damage, so make sure you’re examining by touch as well.
- In the bathroom, check the skylight, if applicable. It’s likely made of plastic, which means it’s vulnerable to cracking, and if it’s cracked, it will leak. A cracked skylight needs to be replaced ASAP.
- Any skylights in other parts of the RV need to be checked for cracks as well, and the seals around them need to be examined for cracks, soft spots, or other damage that could allow water in around the edges.
- Examine the ceiling area specifically surrounding any skylights for discoloration, even if the light itself and its sealant seem okay.
Exterior Walls: Delamination
The most common sign of water damage in the walls of an RV is delamination. To understand delamination, you must first know a little about the basics of how the fiberglass sidewalls of your RV are constructed.
The walls of your RV are made of two primary layers:
- Fiberglass on the exterior and a decorative interior wall.
- In between those outside layers are two extra layers, one of wood and one of styrofoam, which are vacuum-bonded together.
When things impact the outside of the RV–rocks, sticks, etc.–the durable fiberglass exterior might seem to be unaffected, but the styrofoam and wood beneath may get dented.
This can cause the bonding agent to separate, allowing an air pocket to form. This bubble will grow with time, and eventually, allow moisture to seep in and build up.
Moisture seeping through actual cracks or holes in outside or inside layers can also cause this separation to happen, or if water seeps in through cracks in the sealant where the walls are joined with the roof.
Sometimes delamination also happens simply because the RV is old, and the sealant has weakened with time.
Regardless of how the water gets in there, it makes the separation bubble–the delamination–grow and can cause decay in the wood layer inside the wall. This damage is expensive, or sometimes impossible, to fix.
Delamination can be spotted with a careful visual and physical examination:
- Walk around the entire exterior of the RV and look at the sides. They should be smooth and flat, with no bubbles, creases, or waves.
- If you do spot any bubbles, press on them with your hands. If they feel soft or spongy, you may have found delamination.
- Another way to verify delamination is to tap any such bubbles with a plastic spoon or other utensil. Delamination is essentially a bubble of air, so it will sound hollow when you tap on it.
Interior Walls

Inside, start with a thorough visual inspection of your RV’s walls throughout the entire vehicle.
- Look for discoloration, bubbles, and indentations. If there is wallpaper, look for wrinkles and water marks. Feel for soft spots, especially in the corners, near the ceiling, and around windows. Feel also for actual moisture, whether from specific leaks or from condensation.
- Next, focus on the windows, as they’re prone to leaks. Check the windows themselves for any cracks, no matter how small. Then check the seals around them for any signs of damage: cracks, holes, discoloration. Feel for any spots that are soft or spongy or otherwise feel damaged. Then examine the walls around the windows very closely because these areas are especially prone to water damage.
- Be sure to also check any moldings for signs of water damage. Moldings that are loose or that have separated from the walls are a sign of water damage and may be hiding mold or mildew.
- Sometimes, internal light fixtures can show water damage that you otherwise would not have noticed. Be sure to check the walls around interior lights for signs of water damage and the fixture itself for rust or any other signs of damage.
- If your RV is equipped with a furnace or any other heating system, be sure to check around vents. Check the walls for signs of damage, and check the vents themselves for rust or discoloration.
Utilities

Don’t forget to check your utilities.
- Make sure you know exactly where your RV’s hot water heater and furnace are and check these areas thoroughly for signs of water damage. You’re looking for the usual suspects: discoloration, cracks, soft spots, evidence of rust or condensation. If these are located in closets on the outside of the RV, be sure to check the corresponding interior walls as well.
- If your RV has an outdoor shower, this is another area that requires careful examination. Examine the pipes and all places where hardware is connected to the RV itself. Inside the RV, check out the corresponding walls to look for indicators of damage that may not be visible on the outside.
- If there are any other water tanks (such as one to store potable water for use when on the road), examine them. Look at the closet/cabinet where they are located, check out the pipes, and look at the water tank itself to ascertain water-tightness.
- Finally, check out the water inlet, where you connect an outside water supply to your RV at campgrounds or when it’s parked at your home. You want to check out the pipes themselves and the entire area surrounding this connection, inside and out.
Floors & Carpets

It’s very important to thoroughly examine all floors inside your RV for signs of water damage, as these are areas that will potentially be exposed to a lot of water over the life of your vehicle.
Aside from the obvious–bringing in water on your shoes and clothes when the weather is bad–the floors will also bear the brunt of the damage when there are leaks in the kitchen or bathroom.
When water is allowed to sit on the floors for long periods of time, or when a leak goes unnoticed for too long, your RV’s subfloor is at risk.
The subfloor is normally made of pretty solid plywood, but water damage can cause it to rot away, risking the structural integrity of your RV’s floor.
To examine your floors and carpets:
- Start by simply feeling the floor. You are looking for damp carpet or any areas that feel soft or spongy. Be very, very thorough about this. Check every single room, every inch of flooring that you can reach.
- Be sure to check underneath furniture as well as it’s entirely possible for a leak to be causing damage in unexpected places, such as under the bed or behind a couch. Check under the refrigerator, beneath other kitchen appliances, and in every single corner of the bathroom. Pay special attention to the edges of the floors, right next to the walls, and to the corners of rooms.
If you find any areas that feel suspicious, take the time to pull back the carpet or lift up any other flooring to examine the subfloor beneath. If there is damage, it will immediately be visibly obvious; the wood will be soft, spongy, and rotten.
Wood rot in the subfloor can spread quicker than you’d believe, even from a small leak, and while minor damage can often be fixed as a DIY project, larger areas of damage will result in costly professional repair bills.
Kitchen
In the kitchen, start with the most obvious source of water damage: the sink.
- Examine the counter around the sink, looking for a damaged sealant, warpage, and discoloration.
- Examine the faucet for rust.
- Then look underneath the sink; examine the cabinet for soft spots and discoloration beneath the water pipes, and feel the pipes themselves for dampness and look for rust.
- Next, check the rest of the cabinets. Because of their close proximity to steam (from cooking) and other water, the cabinets are a common location to discover water damage. Be sure to examine all kitchen cabinets very, very thoroughly.
- Examine the walls and bottoms of the cabinets. Look at all the edges and corners. You’re looking for mold, mildew, or discoloration, and feeling for spots that are soft or spongy.
- For any upper cabinets, it’s especially important to examine the upper corners and edges. If there are any external leaks at the seal where the roof meets the walls, this is a place where you will often find evidence. Again, you’re looking for discoloration or soft spots. Damage like this to the cabinets is likely a sign that there’s damage inside the walls as well.
Bathroom

As with the kitchen, bathrooms need to be monitored for water damage because there are so many fixtures there that use water.
Check the Toilet
The toilet needs to be properly maintained, and if part of it ever breaks or stops working properly, it should be fixed immediately.
Definitely do not ignore your toilet if it gets clogged or runs continuously, as these problems can lead to overflow and damage.
RV toilets are not quite the same as household toilets, so be sure to consult a guide before attempting repairs yourself.
- You’ll want to check the floor surrounding the toilet, including the seal around the base. Check the internal mechanisms to make sure everything is working soundly, and examine the bowl for cracks.
- Be sure to check the water connection behind the toilet, too; feel for dampness and look for rust. Dysfunctional water connection valves can easily create silent but costly water seepage problems.
Examine Your Shower

Next, examine the shower. Examine the floor around it for possible damage from the overflow, such as soft spots or discolored flooring. Inside the shower, inspect all accessible plumbing.
Check the showerhead for mineral buildup or rust, and consider replacing it if you find any (even if it otherwise doesn’t seem to be leaking).
Check the faucet for rust and dampness, the water shut-off valve if your shower has one, and the hose connecting the shower head to the wall, if applicable.
Check the Shower Floor
After checking the shower hardware, it’s time to get down and look at the shower pan, which is the technical term for the shower floor. It’s probably small and made of either fiberglass or acrylic.
Look for cracks or holes where water could seep through and damage the subfloor beneath. Whether or not you find specific damage to the shower pan, you’ll likely want to remove it to examine the subfloor beneath.
As with the kitchen, it’s very important to examine any cabinets in the bathroom for water damage. Look at the edges and corners, and study the walls and bottoms.
Look for evidence of mold, mildew, or other discoloration. Feel for soft spots. If your bathroom has any upper cabinets, be sure to check their upper corners for signs of water damage too.
Slide Out

If your RV has a slide-out, these are the areas that require extra close inspection. A slide-out is essentially an extra amount of living space that you can extend outward when the rig is parked, which will make your trip seem much more comfortable during the times when you’re not on the road.
However, the very nature of slide-out means that you’re adding a whole lot more opportunities for water to find its way inside your RV. To check:
- Start by sliding the room out and in a few times. If the mechanism functions smoothly with no awkward sounds, that’s a good start. But be wary if the room can’t extend outward without grinding, gritty sounds, or if you can see visual indicators of any kind of damage, then it’s time to look even closer.
- Externally examine the seals around the edges of the slide rooms. You want the sealant to be solid and watertight, no cracks or holes, no discoloration, no spongy feeling. Be sure to check these seals both while the slide room is extended and while it’s retracted.
- Inside, examine the seams of the slide out very, very thoroughly, especially where the slide out connects to the main RV wall and floor.
Conclusion
Regular care and maintenance are important when you own an RV, and one of the most important issues to look out for is water damage. When water gets into places where it shouldn’t be, it can quickly lead to delamination, wood rot, and other costly issues.
Fortunately, with a little practice, a responsible RV owner can get a good grasp of how to monitor their vehicle and check for these issues on their own. By regularly inspecting your RV, you can catch leaks before damage starts, or find damage before it spreads too far.
Sources: Condor Ferries, Camping World, Camper Grid, RV Share, RV Tailgate Life, RV Life, RV Share


